Contents in this Article
show

Are you a fashion freak but still knows only one type of necktie, and only one way to how to tie a tie knot or you are of those who don’t know a single way to tie a tie and probably take someone’s help for tieing his tie. If yes, then not anymore I’ll teach you here, about the different types of necktie and several ways of tieing a tie or necktie in easy step by step tutorial.
This article is all about improving your necktie game. This article will cover everything that is essential for you to know, when you are fond of a necktie as well as you used to wear it in any occasion or in any profession.
A necktie or basically a tie is a type of androgynous accessory or neck wear which is made up of cloth or some another material and used by usually men and sometimes by womens to wear it around the neck as an men accessory of a formal wear or for any other decorative purposes. It takes support of shirt’s collar and it’s knot take place at the center of the neck. I think this much information is enough for introducing about a neck tie.
History of necktie
Like since childhood history is most people’s boring subject, same applies here. Who else wanted to know about the boring history of a necktie, that’s why I’m not taking you in depth of this but if you still feels that it is boring then you can skip this part and scroll down.
The type of necktie which comes first in fashion industry were CRAVAT. It comes from the croatian word croats,hrvati and the french word ‘croates’. By these words the first necktie got his name as cravat. The king of france name louis XIV wears a lace cravat and set the trend of cravat in france. The lace-cravat or jabots taken too long time to improve and arrange well. These cravats were often tied in place by cravat strings, arranged neatly and tied in a bow. After cravat, the steinkirk and stocks were the types of that era’s necktie, which was worn by that time’s soldiers.
After that from 1860-1920s the revolution of necktie placed and this was the period where some sophisticated array of knots and Distinguish style of neckwear were invented. Like as; bow tie, scarf/neckerchief, the long tie, the ascot. These werw the neckwear which is still used by millions of mens of modern era.
From 1920s- present day there were still lots of changes takes place in evolution of tie. After first world-war the tie which come in trend was little bit thick in its width. After 2nd World War the tie which people used to wear was a little bit shorter than today’s tie. After that there were tie’s experiment started, they introduce ties in different colours, different designs, different patterns and in different sizes to the world.
The international tie day is celebrated on 18th October in crotia and various countries of the world.
Cravat Necktie

As we talked about in history section of this post that this was the first neckwear or type of necktie which was worn by 17th century’s peoples. But here we will discuss about the cravats of modern day’s.
Cravat is a traditional neckwear still used by millions of mens. A cravat is neckwear tied around the neck as same as standard necktie but difference is that its width is more than a standard neck tie.
It is usually wear with suits only. There are many ways people used to wear it. Some people tie it under the shirt and open 2 or 3 buttons of the upper side,to show it off. And, some people used to wear it over the shirt and under the suit.
There were more several ways peoples are using, I will talk about two Distinguish ways to tie a cravat in this post.
How to tie a Cravat?
Tie a cravat, basically it is as similar as tieing a necktie but with a little difference. While tieing a necktie like cravat you have to keep in mind it should be neat and clean, you never tie it roughly because it will gonna ruin your whole outfit.
Traditional step of how to tie a cravat tie
The first type of tieing a cravat is the traditional way which have been in use from long time. It is simple and traditional way of tieing it.
Steps for tie a traditional cravat

- First grab your cravat and let it hang on your shoulder through the neck.
- While hanging, keep in mind that length of the left side should be shorter and the length of right hand side should be longer.
- The length of right side should be equal than your neck to belt buckle length.
- Now put the right side up of yhe left side and round it under the left side and make a whole round with it.
- Now see the third image after following the above instructions you will get on the position as shown in 3rd image. After that put it under the knot from the left side and then take it out through neck from the upper side of the knot.
- Now, make it clean and straight with your hand, adjust the length and tightness so that it won’t be untie easily.
Scrunch cravat
The sceond and classic way of tieing a cravat is scrunch cravat, its knot is easy to tie in neck. It is similar as four in hand knot of tieing a standard necktie. Just you have to follow the easy steps to tie a cravat in this classic way and then you can rock with it.
Steps for tie a scrunch cravat

- Grab your cravat and let it hang on your shoulder like shows in image.
- Now make left sides length small and right side’s length equal to the length of your neck to your belt buckle.
- Grab the right side and out it over the left side.
- After that turn it and pass it under the left cravat’s side and let it come out from the right side.
- Now again take it to the right to left from the front side of knot. Now put your thumb between it to make a space.
- Now take your bigger length side under the knot and pass it out through the neck.
- And now pass it through the space you were make by your thumb.
- Now adjust it with your hand and make it tight.
Clip-on Necktie
Clip-on is latest type of necktie added in fashion industry, it is time saving, styling and easy to handle type tie.
It can be wear as a normal necktie on shirts, under the suit and under a V-neck mens stylish sweaters.
Clip-on is a type of necktie which is already sew in shape of standard necktie and it has a clip on it’s knot’s back side. Which save time while you are going to wear it.
Steps to tie a clip-on necktie

- You have to tie a standard with one of the different ways available there and it takes 2-5 min, but in clip-on ties which already comes in tie shape, you have to do nothing in it.
- First close all buttons of your shirt.
- Now grab your necktie from the knot.
- And now, Just you have to clip your necktie on the center of your shirt’s collar.
- Now put down your collar and make it nice with your hand.
Bow tie

It is another type of neckwear. It is basically like ribbon, made up of different types of fabrics. It’s design is slightly different than other types of necktie. It’s middle part is thin and the both corner of bow tie is thicker in it’s width and in a design. Both side of the tie is in same cut.
Like a standard necktie, bow tie also comes in various types. Like; clip – on bow, adjustable bow tie and non-adjustable bow tie. The adjustable bow tie is perfect for any type of shirt with any type of collar with it. And non-adjustable bows are in fixed length which can’t be adjust and it is best for shirt with tight collar in it.
The bow tie has been in use from long time before. From 18th century, people in different professions are using it and it is still used in different professions like; by professors, teachers, receipt collecter, waiters and politicians etc.
Standard tie

A standard or a necktie is a long, fold and sewen piece of clothes, one side of which is little thin than other side. It comes in various width from thick to thin, but in any width It’s length is almost similar. It comes sewen in 2-7 folds.
It is an ideal necktie used almost in every country. It is most valuable type of necktie. It is sign of simpleness along with class. After tieing it shaped like as clip-on tie. But clip-on tie already comes teid in it’s shape rather than that in standard tie you have to tie atie knot in which way you like, fot enhancing your look.
You can design its knot not in various types, just you have to do is changing the way of tieing it. There are different ways to tie a tie, I will discribe here some prevalence ways of tie a necktie here. I’ll give instructions on how to tie a necktie easy steps.
Steps to How to tie a tie easily
As I described that standard necktie, we called it simply a necktie or sometimes tie is most likely to be used. And every fashion conscious used to wear this type of necktie. There are several ways available for tieing a necktie. But you can not use it with every color and pattern of a standard necktie. Their are different knots you can tie with a single tie every knots has it own value. It has to show that you have tieing a different knots and every knots shows it’s quality with different patterns and colors if a necktie. I’ll discuss about that in this post conclusion.
So, it’s time to learn how to tie a tie, in different and classy ways. I’ll first teach you easy way to tie a tie and then some sophisticated ways of tieing a tie.
So, it’s time to learn how to tie a tie, in different and classy ways. I’ll first teach you easy way to tie a tie and then some sophisticated ways of tieing a tie.
Four in hand knot.

The first type of knot is four in hand this is the most easiest, simple and time consuming way of tieing a tie. That is the reason why most people love to tie a tie in four in hand way. It can go with any type of pattern and with any color of tie. In the profession where uniform are allowed, they always used four in hand tie knot. The thing which I don’t like in it is that it doesn’t give the exact shape to the knot like a standard tie should needed.
Steps for tie a four in hand knot
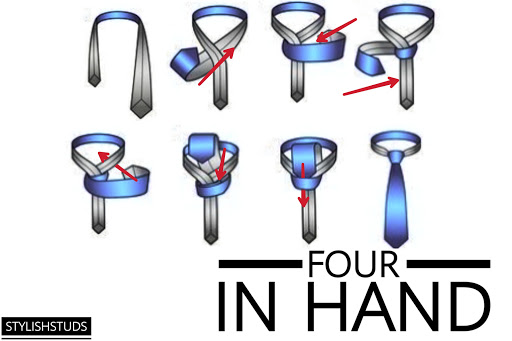
- Take your necktie and let it hang on your shoulders with reverse side- fig1
- Keep wide end to the left side and narrow end at the right side of your neck. The wide end length should be 2-3 inches lower than your belt buckle. If you want it to end on the buckle.
- Now grab the wide end and take it to the right side through under the narrow end.
- Again take it to the left side, this time over the narrow end.
- After that, again take it to the right side from below the narrow end.
- Now, place your thumb center of the knot and this time take it to left side from above of the narrower end, a space will formed because of your thumb between knot and the part you take to the left side.
- Now, from that left side, just grab the wide end and pass it under the knot and take it out from the center of the knot.
- Now, put the wide side under that space you had been created by your thumb and let ut pass completely through it.
- Your four in hand knot is almost ready the last step is tight it manually and place it on it’s right place.
- Just grab the knot and pull wide end your, you’ll see that your knot will automatically go up and get it’s tightness.
The windsor knot

The second knot is the windsor, a traditional and perfect knot for various patterns and colours of tie. I often use this type of knot because it is not too sophisticated and not too simple. It gives your tie a perfect knot shape.
The windsor sometimes called half windsor and full or double windsor. It is one of the most durable tie knot.
The reason the windsor is so durable because it is so even and simple, it does give your tie an uneven look.
How to tie a windsor knot

- First hang your tie around your neck. Let the narrow end of your tie at the right side and wide end of the tie on the left side of your shoulder.
- Length of narrow end should be less, and wide end should be 2-3 inches lower than your waist.
- First of all, grab the wide end and take it to the right side from upper side of the narrow end.
- Again take it under the center of the collar and let the wide side come out completely.
- Now you are on the position that is shown in fig. 3rd in the above image.
- Now slightly take the wide end to the right side pass it under the narrow and let it come out from the left side.
- After that put the wide end under the knot through its center and let it come out from the left side.
- Now your position is as same as shown in fig. 6 in above img.
- Now put your thumb, front of the knot and take the wide end from left to right side from over your thumb.
- Now, from the right side, put the wide end under the knot and let it come out completely from the center.
- Now in the last step put in the wide end of the necktie in the space you have created by your thumb and let it pass out completely.
- And that’s it your Windsor knot is ready.
The Eldredge knot

The Eldredge knot gives a different look to yoir knot, and this look enhance only in some special tie design. If you use that knot in check design necktie or more patterned tie then it will not gonna enhance it look. The type of tie which suits Eldredge knot perfectly is plain color tie. It will show the knot pattern and enhance the knot’s look. A plain color tie which haven’t any pattern design on it will perfect for tieing in eldredge knot.
The third knot we gonna learn about is Eldredge it is quit complicated knot. It takes practice for learning it properly, but if you focused and really wanna learn you can learn it in 3-5 tries. When I tried that knot first time, I was learned making the Eldredge knot after 5 failure.
Steps for tie a eldredge knot.
Eldredge knot half step is almost as same as windsor knot the difference is that it is opposite of the windsor knot but till half way, if you know the steps of tie a windsor knot then it will be easy for you till half way and after that you have to do efforts for completing it.
Steps for tie a Eldredge knot

- First let your tie hang on your shoulder, as I mentioned above that Eldredge knot half step is as same as windsor knot but opposite. So, hang it on your shoulder but just opposite you done in Windsor knot.
- This time put wide end on the right side and narrow end on the left side of your shoulder.
- Along with side, length will also opposite in this type of knot than windsor, this time make the length of wide end 2-3 inches shorter than your belt buckle and give the rest length to the narrow end of the necktie.
- First of all, grab the narrow end and take it to the right side from upper side of the wide end.
- Again move the narrow end to the left side, this time from under the wide end.
- Again take narrow end under the center of the collar and let it come out completely from the right side.
- Now you are on the position that is shown in fig. 5th in the above image.
- Now slightly take the narrow end to the left side pass it under the center of knot and let it come out from the right side, from that position take the na rrow end to the left side through below the wide end.
- By doing this a space will generate on upper right corner of the knot, now take the narrow end and pass it throgh that space of upper right corner of the knot.
- Now from that position again put in the narrow end under the collar and let it come out from that right side.
- Your position is as similar as shown in fig. 10. Now again pick up the narrow end put in between your neck and knot from the right side and let it come out from left side of the knot.
- By doing this again a space will generate on the upper right corner. Now grab your narrow end which is on left side and pass it through that space which is on right side.
- Finally, your Eldredge knot is almost ready hide the extra fabric of narrow end under your shirt’s collar and make your knot clean and enduring by your hand.
Use of different types of tie knots
I described here the tutorial of tie a tie with different types of tie knot. But some questions will definitely be rising in your mind. Like as; is important to learn that various ways of tie a single tie?, when and How to use tdifferent knots?, Which type of colour or design we should go with which type of knot? and so on.
First of all if you are fond of tie a tie and you have some awesome collection of ties with various designs then you should learn atleast three type of tie knots, one should simple, one medium and one complicated. And if you are wearing your tie not as a fashion your just wearing because it is essential for wearing with your uniform in your profession then you are free you can chill by just learning on way of tieing a tie knot. But in this some people who tie their tie in uniform and they are curious and little bit fashion conscious then they can change their knot style and let their tie stand out something different than others.
But after all this the second thing you have two know that which and how many types of knots will stamd out after knotting with your tie’s colour and patterns. The hard and fast rule of knots two stand out is depends upon the colour and pattern of your tie.
The simple the pattern on the tie the complicated the knot should be, similarly the complex the pattern on the tie the simple the knot should be. So, now check your uniform’s tie and see which and how many knots will stand out on that. And the tie freaks check your collection of tie and decide the Number and type of knots for every tie. Now, after reafing that post you are gonna be stand out between your friendsaand colleagues in terms of a tie knowledge, after all we are stylishstuds and our main goal isto improving ourselves and this post is surely gonna improve your tie game.
Ending tip
Here we were discussed about, tie’s meaning, it’s history and different types of tie, with different ways of tie a tie. By, this post I wanted to give you as much knowledge essentials as a fashion freak or as a men also. Because we used to wear tie in any time of our life, and we don’t know when it is become helpful for us.
The ways I described here is some ways you should must know about and learn about that. Some of them were very easy which you can learn easily, but some ways of tieng knot is little bit effort worthy you have to just concentrate a lil bit and i’ll asure you can learn it easily.
